Call us at (408)988-3753

Safety First:
Before jumping into the installation of your shower door please read the "How To" written on handling Tempered Glass. Euro shower doors are easer to install than framed units, but you are working with glass, and it is heavy. It depends on the size of the door, but they usually weight 70-90 lbs. We have several different styles of low cost suction cups available on our store. My favorite is the two cup model SUC2CUP. If you have several panels to set the $ 20.00 for a set will be the best spent money of the whole project.
Wear Safety Glasses
Tempered glass is about eight times stronger than regular glass, but it is glass and it can break. You should wear some eye protection when moving and handling tempered glass. When tempered glass breaks it instantly breaks into little pieces of glass. These little chunks can cut, but they aren't going to cut off your foot or arm. We have provided some fiberboard setting block with your door to be used stand your door on. There are additional fiberboard block in the crate.
Which comes first: Install the Door or the fixed Panels?
You should be installing your fixed panels first. There are unforeseen variables ( high tiles, minor wall conditions) which may cause require that the fixed panels to be shimmed to make them stand correctly. Your goal is to install the fixed panels so that the space for the door is exactly the (W) value on the work-order and the edge next to the door is plumb. With the fixed panels installed you it is an easy task to install the door so the top edge of the door matches the height of the fixed panels.
The basic installation sequence is as follows:
- Install the hinges on the door.
- Stand the door up in place on the 1/2 in thick fiberboard blocks and mark the screw hole locations.
- Remove the door.
- Drill screw holes (1/4 in) and insert anchors.
- Stand the door up in place on the fiberboard blocks and insert the hinge screws.
Verify & Layout:
The first step in installing the door is to verify the space. Note the size of the door glass will not be the same size as your space measurement. The door glass has been reduced to allow for the hardware and seals. If you don't have the original marks on the tile from the measure, you should layout the unit verifying the measurements and put small marks on the tile indicating the centerline of the glass. Your space should match the (W) space measurement on the Work Order. If your walls aren't plumb make sure you know which end of the door is the top and bottom.
Install Hinges
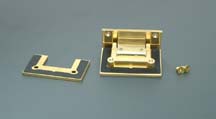
Hinge Design
The hinges are designed with a safety feature that prevents the glass from coming out of the hinge once the door is assembled. The glass has been manufactured with a especial Micky-mouse ear hinge cutout to receive the hinge. This means that the hinge is assembled on the glass.
Each hinge comes with a gaskit set which containing four gaskets. There are two thin gaskets and and two thick gaskets. If you are installing the hinge on 3/8 in. glass you want to use the thick gaskets. If you are installing the hinge on 1/2 in. glass use the thin gasket. Check you work order to confirm your glass thickness. If you don't use the correct gastkets the door will slip or the hinge will bind.
Hint: If you super glue the hinge gasket to the hinge and hinge plate it will make it easier to work with during the installation. Don't get glue on the outside surfaces, it may damage the finish.
Mount and Locate the hinge:
Mount the Hinges
Assemble each hinge and gaskets into the glass hinge cutout, but don't tighten the hinge plate screws. The hinge plate and screws go to the inside of the shower door. Note: The hinge shown in the picture is a Geneva Style (Standard duty). The mouse ear hinge body is typical for the standard duty hinges. The heavy duty Vienna and Cologne hinges do not have mouse ear hinge body casting.
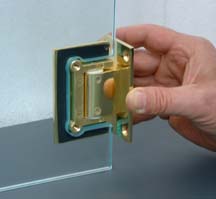
Locate the Hinges
To make sure you have the ability to adjust the door after it is installed you need to locate the hinge into the center of the cutout. With the hinge plate loose slide the hinge all the way up and put a mark on the glass just above the hinge. Now slide the hinge all the way down and put a mark on the glass just below the hinge. Center the hinge between the two marks and set the edge of the hinge clamp to match that of the glass. Using a good screwdriver tighten the hinge clamp screws. If the hinge is correctly assembled with gaskets you can not over tighten hinge plate screws.
Install the Handle

We want to install the handle or knob at this point so that it will be easer to position the door in the door opening. There are different styles of handles and knobs, but most of them use the same through the glass mounting system. On the back to back handles there is an inside handle and an outside handle. The inside handle has two small set screws. When mounted these set screws face downward so that you can't easily see them. Use the allen wrench provided loosen the allen screws and separate the two handles. Now loosen the screws holding the plastic washers. Take note of the order of the plastic washers and sleeve. When assembled on the door there is a plastic washer on each side of the glass, and the sleeve is in the hole between the washers. The plastic washers protect the glass from the metal handle. Don't tighten the screws to much or you will break the washers. Now slide the inside handle onto the studs with set screws down. Tighten the set screws. The handle is designed so that it tighten on the glass as the set screws are tightened.
Mount the Door
On a typical Euro door, the glass is manufactured to have a 1/2" clearance for the bottom wiper. Place two pieces of the 1/2" fiberboard used in the shipping crate on the curb of the doorway of the shower. For this next step it is helpful to have someone on both sides of the door.
Door Only: If you are installing a door only all you need to worry about in the positioning of the door on the threshold, and having the door straight up & down. With the corner protectors still on the glass and following the "Guidelines for Handling Glass" stand the door on the fiberboard in the door opening. Using a level position the door and mark the screw locations for both the top and bottom hinges. Carefully remove the door and set it aside. Door & Panel: When installing a door and panel it is recommenced that the fixed panel be in position, but not sealed with silicone. With the corner protectors on the glass and following the "Guidelines for Handling Glass" stand the door on the fiberboard spacers in the door opening. Position the door so that it is located on the threshold in line with the side panel. Temporally remove the top corner protector on the door and check to see if the height of the door and side panel are the same. You may need to add an additional piece of cardboard under the door to make the top corners match. With the door positioned to match the inline panel mark the location for the screw holes for the hinges on the wall. Carefully remove the door and set it aside.
Drill & Anchor
Using the 1/4" carbide drill each of the marked hole locations. The hinge screws are 1 1/2" long so make sure your holes are deep enough to receive the anchor. Push a anchor into each hole. The top of the anchor should be level with surface.
Tip: If you put a small amount of silicone on each anchor, it will make it easier to screw in the hinge screws, and it will seal the hole as well.
Hang The Door:
Position the door as before and install a screw in the upper hinge, and then one in the bottom hinge. Now install the rest of the screws. Check to make sure the hinge plate screws are tight. There should be a slight slope on the curb into the shower. Open the door into the shower to remove the fiberboard blocks from under the door.
Install Seal:
After all fine tuning is completed we need to install the hinge seal. Open the door (inward if possible) all the way to expose the back edge of the glass. Clean the edge of the glass of finger prints and oils. The eSHOWERDOOR kit came with a double finned "T" vinyl seal. Cut the seal the the correct lengths. To install the seal peal the red backing down for about 2 inches. Position this part of the seal on the glass. Now slowly pull off the backing off and press the seal on to the glass. The seal has two fins, a short fin, and a long fin. If you have a tight install, and have the glass slid into the hinges all the way, you will need to trim off the long fin and use the short fin.
Finishing Touch
The last thing you want is a call-back because the door moved in a hinge. After your door is hung and the seals installed we recommend putting a drop of super glue between the inside gasket and the glass. This will prevent the door from moving in the hinge. To do this take the fiber setting blocks you used when you hung the door, and from the inside of the shower, open the door into the shower and then close it slowly on the setting blocks to support the weight of the door. With the door weight supported by the setting blocks, remove the hinge plate from top hinge add a drop of super glue, replace the hinge plate and tighten the screws. Repeat the process on bottom hinge. To remove the setting blocks open the door into the shower to put the weight of the door back on the hinges.
Note: There was a small tube of super glue provided in the installation kit. DO NOT USE SILICONE SEALANT for this final step.
Install the bottom sweep
First measure and trim the bottom sweep so it fits the door glass. The angled deflector fin goes to the inside of the shower. You should round the tip of the bottom sweep so the scrtch their ankle on it.
The bottom sweep just presses onto the bottom edge of the door glass. No silicone is necessary. When installed correctly the two fins should just kiss the curb of the shower. The bottom sweep is the one part of the shower door which can be easly replaced if it starts to look bad.
Final Step
If you didn't have crystal shield II installed at the factory now is the time to apply it. Do the door and the hardware. It will make it easier to keep the door looking great.
sShowerDoor com LLC
service@eshowerdoor.com - Terms & Conditions
phone: (408) 988-3753 Fax: (408) 988-4423
© 2004–2018 eShowerDoor.com All rights reserved.