Call us at (408)988-3753
Which comes first: Install the Door or the fixed Panels?
You should be installing your fixed panels first. There can be unforeseen variables ( high tiles, minor wall conditions) which may prevent the panels from standing straight. You will need to adjust the clamps to make them stand correctly. Your goal is to install the fixed panels so that the space for the door is exactly the (W) value that is on the work-order at the top and bottom of the door opening. With the fixed panels installed it is an easy task to install the door so the top edge of the door matches the height of the fixed panels.
U-Channel vs Clamps
A U-Channel installation tends to be easer than a clamp install primarily because the silicone work is easier. It is also easer to adjust the panels for a perfect door seal installation. This page deals with Clamp installations.
Verify & Layout:
The first step in a install is to layout the unit, and verify sizes of each panel. Note the size of the fixed panels will not be the same size as your space measurements. They have been adjusted to allow for a small gap (usually 1/8") between the glass and the tile. If you don't have the original marks on the tile from the measure, you should layout the unit verifying the measurements and put small marks on the tile indicating the centerline of the glass.
Installing Fixed Panels with Clamps
Basic Installation Steps
- Install the clamps on the fixed panels
- Position the panels and trace the footprint of the clamps onto the tile.
- Remove the panels and remove the clamp hardware from the glass.
- Install the clamps on the tile
- Install the glass panels in the clamps
- Seal the panels with silicone
When you receive a shower door kit with with fixed panels for a clamp install you will notice the there is blue vinyl tape along the edges of the glass which will but up the the tile surfaces. Do not remove this tape it is masking for when you seal the panels with silicone.
Clamp Positioning
The first step is the put the clamps on the glass. The notches in the glass are oversized to allow some adjustment of the clamp position. The clamps should be mounted in the middle of the notch extending about 1/8" out from the edge of the glass. You will need to trim the blue tape so that it isn't trapped under the clamp. Tighten the clamp screws so that the clamps don't move when you stand the panels up.
Footprint
It is helpful to have some wooden shims for this next step. Stand the panel up in place and adjust the clamps as required. The door was designed to have an 1/8" gap between the tile and the glass. Adjust the clamps so the door "W" is correct top and bottom. Trace the clamp footprint onto the tile. Remove the panels so that you can take the clamps off the glass.
Install the Clamps
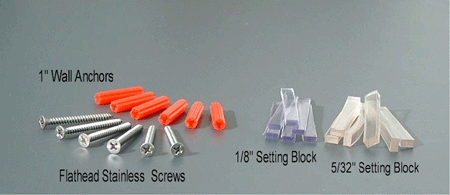
Mark the hole locations and drill the tile using the 1/4" carbide tipped drill provided. A hammer drill makes the hole drilling an easy task. Tap in the green anchors so that they are flush with the tile surface. Trim if needed. Put a little silicone on the anchor head and on the bottom of the clamp. Put in the screws and tighten. Wipe off any excess silicone which squeezed out.
Install the Panels
You need to put down some wood shims or cardboard so that you can set the glass in place without the glass hitting the tile. With the glass in the clamp install the clamp plates, but don't tighten the clamp plate screws. There should be a gasket between the clamp and the glass. Adjust all the panels so the gaps are good and the door "W" is correct. Tighten the clamp plate screws.
Hang the Door
At this point you should hang the door. The door is designed to have 1/2" space under the door. If you stand the door glass up on a couple of the fiber blocks from the shipping crate it will be about an 1/2".
-
Wall mounted Doors are designed to have 1/4" space on the hinge side, and 3/16" on the handle side.
-
Glass to Glass mounted Doors are designed to have 3/16" space on the hinge and handle side.
Install the Seals
The standard seals for the door are a 7/32" Bulb seal for the handle side of the door, and a Dual Fin seal for the hinge side of the door. Install the handle side seal first. If the door swings next to tile the seals goes onto the door glass edge. If the door swings next to a fixed panel the seal goes onto the fixed panel. Adjust the door so that the handle side seal just kisses the other side. Tighten the hinge clamp screws to lock the door in place. Open the door all the way out and get into the shower to install the dual Fin seal. You have to cut the seal to go around the hinges. The seal is installed on the glass edge of the door. The seal should just kiss the other surface. On the dual fin seal one fin is longer than the other. You can cut off the long fin if seal is rubbing too hard.
Silicone Work
At this point all of the glass for the shower should be installed. The door with seals should swing smoothly both in and out. The fixed panels should still have the blue vinyl tape along the edges next to the tile. Now you need put masking on the tile next to the glass. You will be shooting silicone into the gap between the glass and the tile. This is a messy process. Be ready with paper towels and a trash container. Silicone will get a skin, so you want to do one run at a time. Work from the bottom up.
For this next step it helps to have someone assist as a coach. You will be shooting silicone into the gap between the glass and tile. As you shoot silicone into the gap, the coach can guide you to make sure the silicone has oozed out the other side. Wipe off the excess silicone on one side, and then wipe the other side. Now you can pull off the masking off the glass, and tile. You may get a few whiskers of silicone from pulling off the masking. You can spray silicone with alcohol or windex and then smooth down any whiskers. The silicon will get a skin, and if you continue to smooth the silicone you will get wrinkles.


