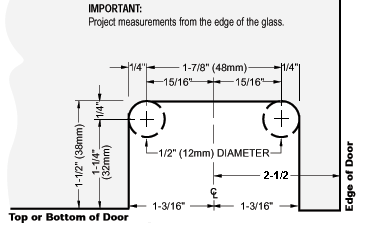
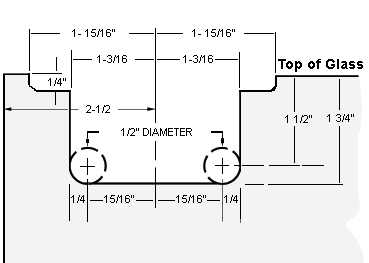
| 6)
Position the door :
In this section
we want to stand our door glass up in position
so we can mark the location
for the bottom pivot hinge plate, and find
the correct location for the adaptor pivot
block for the top hinge. On a typical Euro
door, the glass is manufactured to have a
1/2" clearance
for the bottom of the door to allow for proper
operation of the door sweep.
Hint: Use
the 1/2" fiberboard
used in the shipping crate as setting blocks.
Keep the corner protectors on the glass if
possible.
With one person
on the inside and one on the outside of the
shower stand the door up on the setting blocks
and center it in the opening. It's not possible
to mark the holes when the door is in the
closed position, so trace the outline of
the hinge base plate on the curb.
Next we need
to locate the position of the top hinge pivot
screw. With the door standing in position
and the pivot block on the hinge pivot pin
and in the header bar channel center the door
and mark the location of the pivot block in
the header bar.
Hint: Some
installers will put a couple of pieces of
tape on the adapter block with the end loose.
Then when the door is centered they use
the loose ends to tape the adapter block
in position. Then when the door is removed
the adapter block stays in the header bar.
It is an easy task to drill the hole in
the header bar using the adapter block as
a guide.
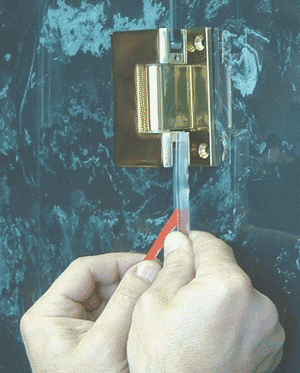
Carefully remove
the door and set it aside. The next step is
to drill a 3/16" hole in header bar for
the pivot screw. Holding the pivot block in
the header bar channel use your marks to position
it and drill the screw hole using the hole
in the pivot block as a guide.
Remove the
top hinge from the door and install the
hinge into the adaptor block and header bar
as if the door were in the closed position.
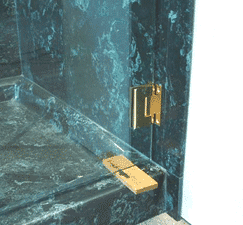
Remove the bottom
hinge from the door, and twist the base plate
so you can access the screw holes. Position
the hinge on the threshold and mark the screw
hole locations. Drill the hinge holes and
insert the anchors. The anchors should flush
with the surface of the curb. Put a small
bead of silicone on the bottom of the hinge
base and install the bottom pivot hinge.
Prepare for
the hanging the door. You should have the
top hinge screwed to the header bar but without
the back plate. The bottom hinge should be
screwed to the curb in the closed position
and no back plate. Carefully put the door
inside the shower. Do
Not stand it directly on the tile. Put
the 1/2" thick fiberboard setting block
on the curb in the door opening. With one
person on the inside of the shower, and one
on the outside. Pick up the door and place
the bottom edge on the glass on the fiberboard
blocks . The person on the outside assists
in the guiding the glass to avoiding glass
to glass contact. With the weight on the fiberboard
blocks carefully stand the door up and align
the hinge cutouts with the hinge body. install
the hinge plate and center the door in the
door space. Tighten the screws. Make sure
you use a screwdriver which is in good condition
and is the correct size. Do the same for the
top hinge.
Hint: To
avoid any possibility that the door might
move in the hinge some installers will put
a small amount of super glue between the
gasket and the glass on the inside hinge
plate.
Carefully
open the door into the shower, remove the
fiberboard setting blocks. Check the clarence
on both sides of the door and adjust if necessary.
|